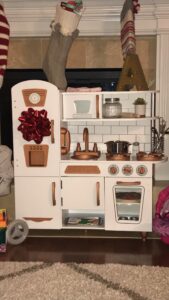
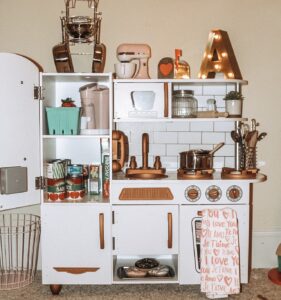
If there’s anything you’ll learn about me here on this blog, it’s that I do nothing in life “Simple”. I always have to go all out and that’s exactly what I did when I created my little girl’s kitchen last Christmas. I always see parents asking around the holidays “What’s the best play kitchen” and “How can I make my play kitchen look fancier”. Well, I’m here to let you in on all my DIY secrets and where I snag my decor. I will have all items I used, their price and where to buy them linked below to make things easier on you! You’re welcome 🙂
The kitchen I started with is the KidKraft White Vintage Kitchen. It comes in white, pink, red and blue but I went with white to keep things aesthetically pleasing. Warning- this thing is a pain in the butt to put together. So grab your tool box and a big glass of wine and get to work way before Christmas eve. Otherwise Santa might lose a few more hours of sleep! I think all together it took me and my husband about 4 hours and lots of expletives to construct. **You don’t have to use this kitchen. You can use these steps below for any play kitchen makeover. Simply deconstruct your kitchen and follow the steps.**

Before you get to work though, you’re going to want to pull out all of the silver pieces (if yours is the white version, yours will be silver. not sure on other colors) and put them aside. You need be spray painting these! I used Devine Color by Velspar found at target in the Radiant Metals collection. Get 2 cans because you’ll need it! Lay out each piece and spray. Let each one dry completely and then rotate and continue spraying until each side is covered. You’ll want to do this twice to get them full covered. Once these are done and dry, sit them aside for construction.

The next thing I did was take contact paper and place it on the Counter top to give it the appearance of Marble! You can find it on Amazon for about $6.00. Simply follow the directions included and go for it! It has no drying time and is ready in seconds!

Final step, The “Back Splash”. You’re not going to believe me, but this is simply a piece of White foam board! I bought a foam board from walmart for about $2, a black sharpie and a ruler and that’s all you need! You’ll want to mark off 6 inch long by 3 inch wide Rectangles. To do this, start on the top of your board and measure 3 inches down, then 6 inches over. Make a mark. Then 6 inches over from there. Then once you have the first row, Measure 3 inches from the edge of the board and 3 inches from the top line and make another mark. This gives the “Subway Tile” appearance. Complete the entire board (Takes maybe 5 minutes) and you’re done!

Now, Construct your beast! Once you have fully constructed the kitchen, secure your backsplash with finishing nails or gorilla glue! Chances are it will pop off occasionally but it’s easy to re-attach!
Voila! You have a beautiful Pinterest worthy kitchen! Visit my Shop My Instagram page to find out how I decorate my kitchen and where I find all my awesome goodies!
Leave a Reply